Contents
- Why Blood Work Is the Foundation of Any Health Strategy
- What "Normal" Actually Means (And Why It Misleads You)
- Level 0 ... The Absolute Basics Everyone Needs
- Level 1 ... The Next Step: Sex-Specific and Metabolic Deep Cuts
- Level 2 ... Advanced and Specialized Testing
- What Function Health Actually Tests and Why It Matters
- How to Draw Blood So Your Numbers Mean Something
- Schedule A: Best Bang for Your Buck
- Schedule B: The High-Performance Track
- How to Test Whether Your Supplements Are Actually Working
- Turning Results Into a Protocol
- Beyond Blood: The Tests That May Matter More
1. Why Blood Work Is the Foundation of Any Health Strategy
Most people have no idea what is happening inside their own body. They feel fine, so they assume they are fine. Or they feel bad, get a physical, hear "your labs look normal," and go home with nothing actionable.
Both of those people are flying blind. The first one is guessing. The second one was measured too narrowly and told the wrong thing about the results.
A health strategy without measurement is a belief system. You can eat well, train hard, sleep properly, and still carry an inherited lipid risk that quietly triples your cardiovascular danger while you feel excellent. You will not feel insulin resistance building for years. You will not feel a thyroid drifting. You will not feel iron dropping until you have been tired for months and assumed it was stress or aging.
The value of a real baseline is not the day you get it. It is five years later, when you have a dozen data points under identical conditions and you can see exactly what direction you are moving and how fast ... before anything becomes a diagnosis.
2. What "Normal" Actually Means (And Why It Misleads You)
This is the single most important concept in the entire guide, and it explains roughly ninety percent of the confusion people have about lab results.
A reference range is not a health target. It is a statistical description of a population.
When a lab prints a range next to your result, that range is typically the central 95% of a reference population. Not the healthiest 5%. Not the optimal value. The middle of a bell curve that includes sedentary people, people with undiagnosed conditions, and people who happened to be in the sample when the range was established.
Two things follow from this, and both matter enormously:
First: "in range" is not the same as healthy. It means you resemble most people who got tested. In a country where a large share of adults are metabolically unwell, resembling the average is a low bar. Your fasting glucose can sit at the top of normal for a decade while insulin resistance builds underneath it.
Second: roughly 5% of perfectly healthy people will fall outside range on any given test. By definition. Order 40 tests on a completely healthy person and you should expect about 2 flagged results ... not because something is wrong, but because that is how probability works.
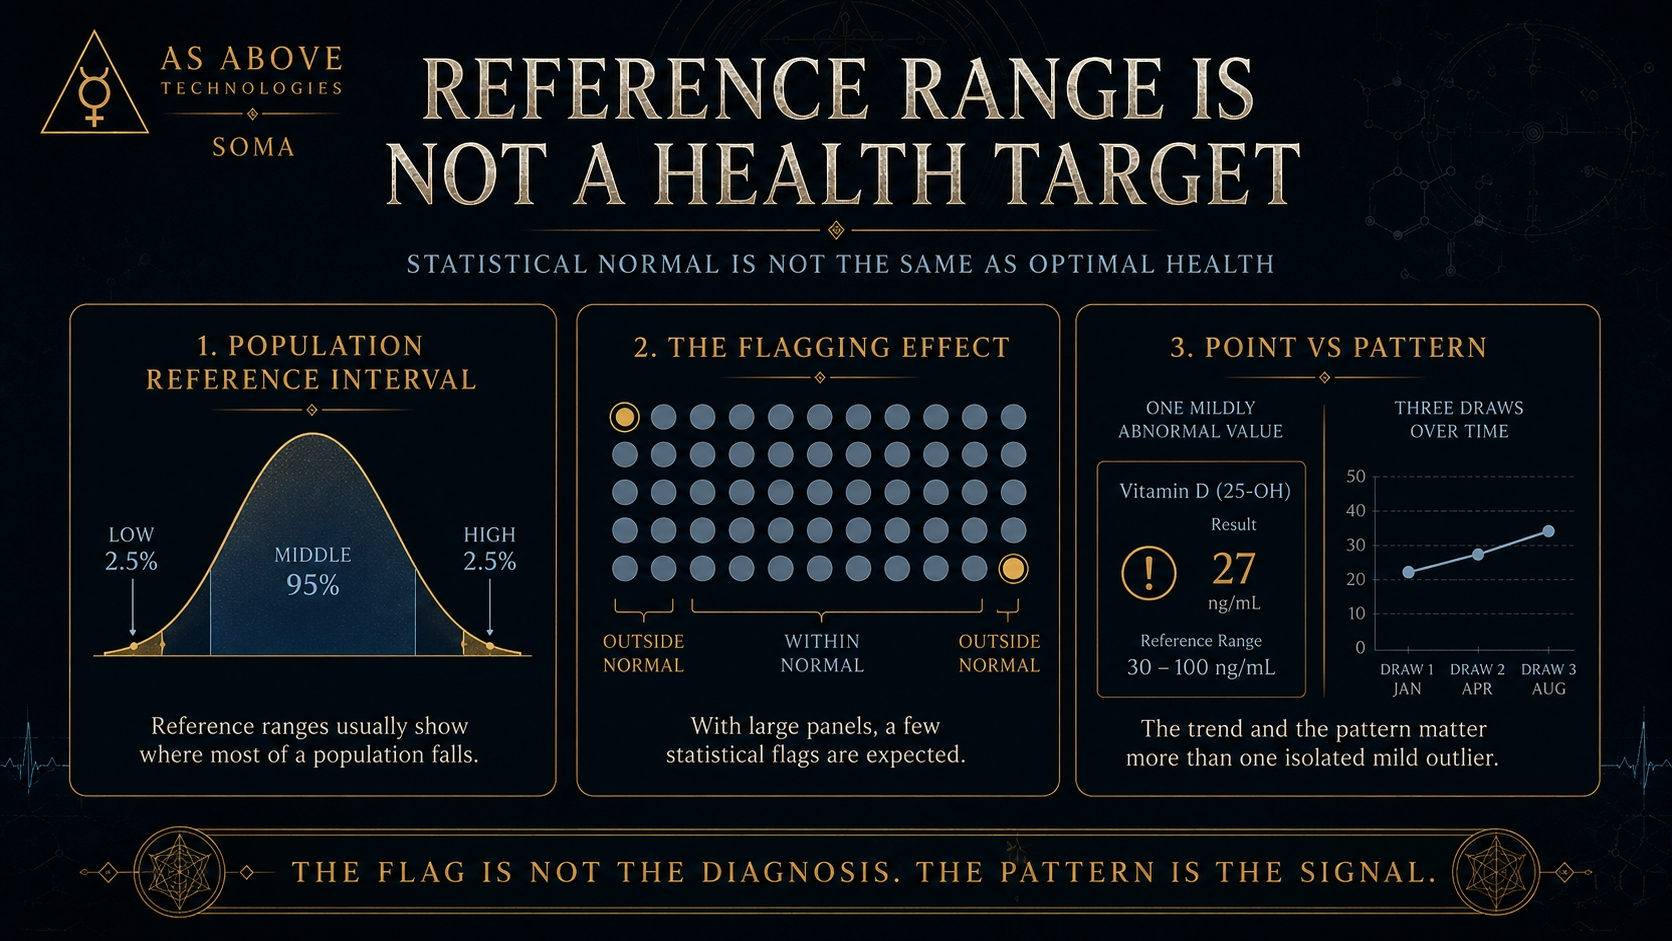
The correct posture when reading results is not "which ones are red." It is: which ones matter, which ones are trending in a concerning direction, and which ones change what I actually do? A single mild out-of-range value in isolation is almost always noise. A marker moving consistently across three draws is signal. Hold onto that distinction. Everything below depends on it.
3. Level 0 ... The Absolute Basics Everyone Needs
This is the panel every adult should have as a baseline, regardless of age, sex, fitness level, or how good you feel. These tests are common to both men and women. Most are covered by insurance as part of a standard physical. If you do nothing else, do this.
| Test | Priority | What It Measures | Why It Matters |
|---|---|---|---|
| CBC with Differential | EssentialPeriodic | Red blood cells, white blood cells (5 types), hemoglobin, hematocrit, platelets, MCV, RDW | Your blood system snapshot. Catches anemia, infection, immune problems, and blood disorders. RDW (red cell distribution width) has emerged as an independent predictor of all-cause mortality in large studies. Cheap, routine, and dense with information. |
| Comprehensive Metabolic Panel (CMP) | EssentialPeriodic | Glucose, BUN, creatinine, eGFR, sodium, potassium, chloride, CO2, calcium, albumin, total protein, bilirubin, ALP, ALT, AST | Organ function scan covering kidneys, liver, electrolyte balance, and blood sugar. Note: a CMP does not include thyroid. That surprises most people and it needs to be ordered separately. |
| Lipid Panel | EssentialPeriodic | Total cholesterol, LDL-C, HDL-C, triglycerides | The standard cardiovascular risk screen. Useful but incomplete on its own ... which is why ApoB and Lp(a) below matter so much. |
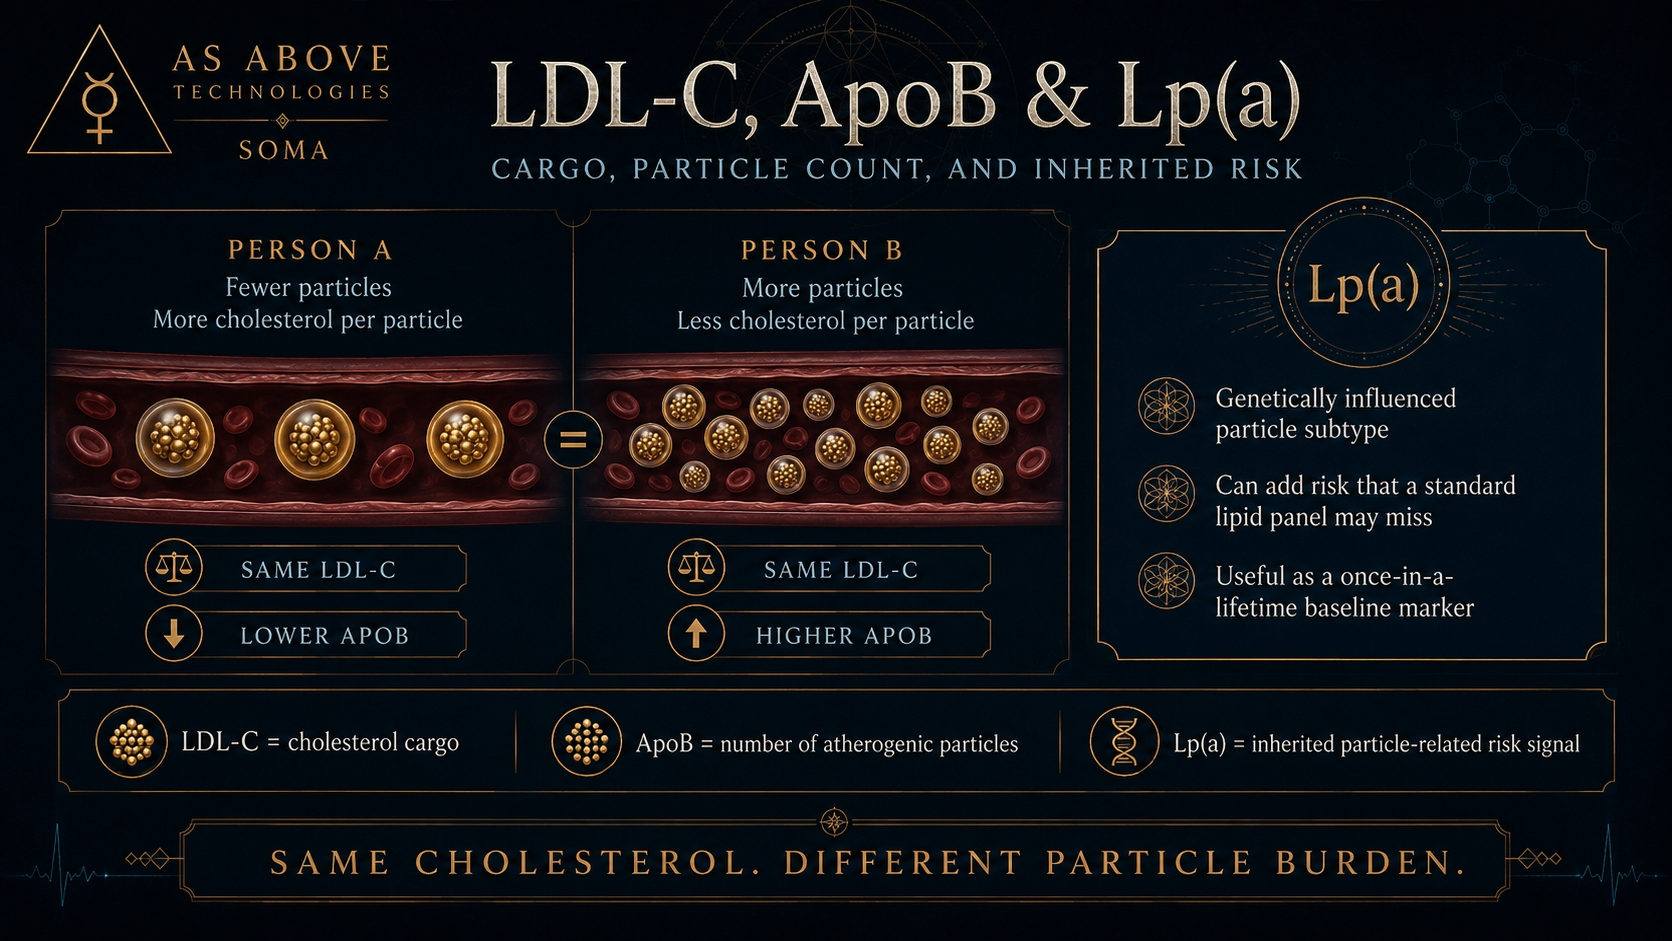
| ApoB (Apolipoprotein B) | Great to HavePeriodic | Direct count of atherogenic (artery-clogging) particles | This is the single most important addition to a standard lipid panel. LDL-C measures the cholesterol inside particles. ApoB counts the particles themselves. Two people with identical LDL-C can have meaningfully different particle counts, and the one with more particles carries more risk. When LDL-C and ApoB disagree, ApoB tracks cardiovascular outcomes better. It is cheap, typically $15-30 out of pocket, and most standard panels still skip it. Ask for it by name. |
| Lipoprotein(a) / Lp(a) | Baseline Once | A genetically determined lipoprotein variant that independently raises cardiovascular and stroke risk | Test this exactly once. Lp(a) is largely inherited and does not move much with diet or exercise. Roughly 1 in 5 people carries an elevated level, and it is completely invisible on a standard lipid panel. Someone can have textbook cholesterol and a serious inherited risk sitting underneath, undetected for their entire life. The 2026 ACC/AHA dyslipidemia guideline now recommends measuring Lp(a) at least once in every adult's lifetime ... the first time American cardiology has recommended universal screening. Caution: Lp(a) is reported in two different units (mg/dL and nmol/L) that are not interchangeable. Know which one you received before comparing to any threshold. |
| HbA1c (Hemoglobin A1c) | EssentialPeriodic | Average blood sugar over roughly 3 months, based on red blood cell lifespan | The single best snapshot of blood sugar control over time. Because it tracks the lifespan of your red cells, testing it 4 weeks after a diet change is wasted money. Give it a full quarter to reflect reality. |
| Fasting Glucose | EssentialPeriodic | Blood sugar at the moment of the draw, after fasting | Included in a CMP. Useful in combination with HbA1c and insulin for the full metabolic picture. |
| Fasting Insulin | Great to HavePeriodic | How much insulin your body is producing to keep glucose in range | This is the test most doctors skip and the one that catches metabolic problems earliest. Your body compensates for insulin resistance by producing more insulin, holding blood sugar in the "normal" range for years while the underlying problem grows. Fasting insulin reveals that compensation while glucose still looks fine. Adding it to a standard panel costs very little. |
| TSH (Thyroid Stimulating Hormone) | EssentialPeriodic | Pituitary signal telling the thyroid how hard to work | The standard thyroid screen. Catches the most common form of hypothyroidism. But TSH alone can miss central hypothyroidism (where the problem is in the pituitary, not the thyroid) and tells you nothing about T4 to T3 conversion. |
| Free T4 and Free T3 | Great to HavePeriodic | The actual thyroid hormones circulating in usable form | If you have symptoms and a normal TSH, these are what earn their cost. Free T4 is what the thyroid produces. Free T3 is the active form your cells use. Together with TSH they give the full thyroid picture rather than a single screening number. |
| Vitamin D (25-hydroxyvitamin D) | EssentialPeriodic | Circulating vitamin D status | Widely deficient, especially at higher latitudes. If you live somewhere with real winters, the difference between a February value and a July value can be dramatic. Know which season your number came from. |
| hs-CRP (High-Sensitivity C-Reactive Protein) | Great to HavePeriodic | A general marker of systemic inflammation | Useful for trend, not for a single reading, because it spikes with any recent infection, injury, dental work, or hard training session. Persistently elevated hs-CRP is meaningful. A one-time spike usually is not. |
| Ferritin + Iron Panel (iron, TIBC, saturation) |
EssentialPeriodic | Iron stores and iron transport capacity | The most ignored high-yield test on this list, especially for women. Iron deficiency without anemia is extremely common and causes fatigue, hair loss, brain fog, and poor exercise tolerance ... while hemoglobin still reads perfectly normal. A CBC alone will miss it. Ferritin is also an acute-phase reactant (it rises with inflammation), so interpret it alongside hs-CRP. |
| GGT (Gamma-Glutamyl Transferase) | Great to HavePeriodic | Liver and bile duct enzyme, sensitive to alcohol and metabolic stress | More sensitive than ALT/AST for alcohol-related liver stress. Also elevated in metabolic syndrome, fatty liver, and bile duct obstruction. Not always included in a standard CMP. |
| Uric Acid | Great to HavePeriodic | End product of purine metabolism | Elevated levels are associated with gout, kidney stones, cardiovascular risk, and metabolic syndrome. Cheap to add. |
| Homocysteine | Great to HaveBaseline Once | Amino acid linked to B-vitamin status and cardiovascular risk | Elevated homocysteine is associated with increased cardiovascular risk and reflects B12, folate, and B6 status. A useful metabolic crossroads marker. Retest mainly if initially elevated or if supplementing to lower it. |
| Magnesium | Great to HavePeriodic | Intracellular mineral critical for hundreds of enzymatic reactions | Widely under-consumed. Serum magnesium is an imperfect measure (most magnesium is intracellular), but it is what is available and low serum values are meaningful. |
4. Level 1 ... Sex-Specific and Metabolic Deep Cuts
Once your Level 0 baseline is established, Level 1 adds the tests that are specific to your biology and life stage. These are not exotic. They are what a good endocrinologist or reproductive specialist would order ... most people just never get referred to one.
For Men
| Test | Priority | What It Measures | Why It Matters |
|---|---|---|---|
| Total Testosterone | EssentialPeriodic | Total circulating testosterone, bound plus free | The screening anchor for male hormonal health. Must be drawn early morning (before 10 AM), fasting. Both the AUA and Endocrine Society require at least two separate morning measurements, at the same lab using the same assay, before diagnosing deficiency. A single afternoon draw after lunch is close to meaningless due to diurnal variation. If a clinic runs one convenience draw and offers you testosterone that same week, they skipped the standard of care. |
| Free Testosterone | EssentialPeriodic | The unbound, biologically active fraction | Matters because SHBG shifts can move total T without moving free T. Method warning: direct/analog free-T immunoassays are widely considered unreliable. Calculated free T (from total T, SHBG, and albumin) or equilibrium dialysis are preferred. A consumer paying for "free testosterone" may be buying a bad assay. |
| SHBG | EssentialPeriodic | Sex Hormone Binding Globulin, the carrier protein for testosterone | Determines how much T is actually free and available. Low SHBG is associated with insulin resistance. High SHBG with aging, hyperthyroidism, and liver disease. Without it, total T is hard to interpret. |
| Estradiol (Sensitive, LC-MS/MS) | EssentialPeriodic | Primary estrogen, measured by mass spectrometry | Men need the sensitive assay. The standard immunoassay was designed for female physiologic ranges and is inaccurate at male concentrations. Ordering the wrong estradiol test is one of the most common mistakes in male hormone panels. |
| LH and FSH | EssentialBaseline Once | Pituitary hormones that signal the testes | These separate primary testicular failure (low T, high LH/FSH) from secondary/central causes (low T, low or normal LH/FSH). Without them, you cannot tell why testosterone is low, which completely changes what should be done about it. Any clinic that prescribes testosterone without checking LH/FSH skipped the differential diagnosis. |
| Prolactin | Great to HaveBaseline Once | Pituitary hormone | Elevated prolactin can suppress gonadal function and can signal a pituitary adenoma. Cheap, and it catches the rare but serious cause. |
| DHEA-S | Great to HavePeriodic | Adrenal androgen precursor | Declines predictably with age. Useful context for the overall hormonal picture. |
| PSA (Total and Free) | Great to HavePeriodic | Prostate Specific Antigen | Screening is genuinely controversial due to overdiagnosis. Generally discussed starting age 50, or 40-45 for higher-risk groups (Black men, strong family history, BRCA2 carriers). Practical caveat: PSA rises with ejaculation, cycling, prostatitis, and digital rectal exam. Abstain 48 hours and avoid cycling before the draw. |
| IGF-1 | Optional | Growth hormone axis proxy | Useful context. But be aware: this is the marker most aggressively used to sell growth hormone and peptide protocols. Higher is not simply better. IGF-1 has a complicated relationship with longevity and cancer risk. |
For Women
| Test | Priority | What It Measures | Cycle Timing |
|---|---|---|---|
| FSH | Essential | Ovarian reserve and axis communication | Day 2-4 (early follicular) |
| LH | Essential | Pituitary-ovarian signaling | Day 2-4 |
| Estradiol | Essential | Primary estrogen | Day 2-4 |
| Progesterone | Essential | Confirms ovulation, luteal adequacy | 7 days post-ovulation (see note below) |
| AMH | Great to Have | Ovarian reserve marker | Any day (relatively cycle-stable) |
| Testosterone (Total + Free) | Great to Have | Androgen status, PCOS assessment | Day 2-4 preferred |
| SHBG | Essential | Carrier protein affecting free hormone levels | Day 2-4; note that oral contraceptives significantly raise SHBG |
| DHEA-S | Great to Have | Adrenal androgen precursor | Any day |
| Prolactin | Great to Have | Pituitary hormone | Any day; elevated prolactin causes cycle irregularity and infertility |
| TPO + Thyroglobulin Antibodies | Essential | Autoimmune thyroid markers (Hashimoto's) | Any day. Hashimoto's is far more common in women. Antibodies often appear years before TSH shifts. Under-tested. |

Perimenopause and Postmenopause
Perimenopause is characterized by wildly fluctuating hormones. A single normal FSH or estradiol does not rule it out. Diagnosis is primarily clinical, based on symptoms and cycle changes, not on a lab value. Women are routinely told their labs are "normal" while clearly symptomatic, and that is a failure of interpretation.
Postmenopause: cycle timing becomes irrelevant. The panel shifts toward cardiometabolic and bone risk. Priorities become ApoB, Lp(a), HbA1c, insulin, thyroid, vitamin D, and DEXA for bone density, since fracture risk rises sharply after estrogen loss.
5. Level 2 ... Advanced and Specialized
This is where the money gets wasted if you are not careful. Some items here are genuinely valuable. Others are aggressively marketed to health enthusiasts with minimal evidence behind them. I am going to be direct about which is which.
Worth It
Redundant or Marginal
Actively Oversold
6. What Function Health Actually Tests and Why It Matters
I use Function Health. It costs $365/year (reduced from $499 in late 2025), tests 100+ biomarkers at your initial draw and re-tests roughly 60 at a mid-year follow-up, through Quest Diagnostics. Clinicians review every result. HSA/FSA eligible.
Here is what their panel covers, organized by body system, with honest notes on what each category tells you and what it misses.
Heart and Lipids (15 markers)
Total cholesterol, LDL-C, HDL-C, triglycerides, ApoB, Lp(a), hs-CRP, non-HDL cholesterol, cholesterol/HDL ratio, plus the NMR particle breakdown (LDL particle number, LDL pattern, LDL peak size, large HDL particles, small and medium LDL particles). This is closer to what a preventive cardiologist would order than a standard physical. The NMR detail is a bonus on top of ApoB.
Metabolic (4 markers)
Glucose, HbA1c, leptin, uric acid. Notable absence: fasting insulin. Without it, you cannot calculate HOMA-IR for early insulin resistance detection. This is the biggest gap in Function's panel relative to what I would build from scratch. If you use Function, consider adding fasting insulin as an on-demand test or through a separate order.
Thyroid (5 markers)
TSH, free T3, free T4, thyroglobulin antibodies, and selenium. This is a complete thyroid picture, not just a TSH screen. Selenium is included because it is a cofactor for the enzymes that convert T4 to the active T3.
Female Hormones (9 markers)
AMH, SHBG, FSH, LH, prolactin, DHEA-S, free and total testosterone, estradiol. This matches what a reproductive endocrinologist would order.
Male-Specific (4 markers)
DHEA-S, FSH, free PSA, and total PSA. The core male hormone markers (testosterone, SHBG, estradiol) are tested for everyone. Note: Function does not appear to specify the sensitive estradiol assay (LC-MS/MS) for men. If you are a man tracking estradiol closely, confirm which assay is being run.
Vitamins, Minerals, and Nutrients (19 markers)
Vitamin D, the full iron panel (iron, ferritin, saturation, TIBC), magnesium, zinc, homocysteine, methylmalonic acid (a more sensitive B12 status marker), calcium, and an unusually detailed omega panel: total omega-3, EPA, DHA, DPA, omega-6 total, arachidonic acid, linoleic acid, omega-6/omega-3 ratio, and arachidonic acid/EPA ratio. This is closer to a standalone OmegaQuant test than what most lab panels offer.
Liver (8 markers), Kidney (9 markers), Pancreas (2), CBC (8), Electrolytes (6), Immune (7), Autoimmune (4), Urinalysis (20), Heavy Metals (2)
Standard organ function panels with good depth. The urinalysis is full (20 fields including microscopic findings), which contributes to the total biomarker count. Lead and mercury are included as heavy metals.
If you decide it fits, start at functionhealth.com. Read the two gaps above first, and plan on ordering a fasting insulin separately.
7. How to Draw Blood So Your Numbers Mean Something
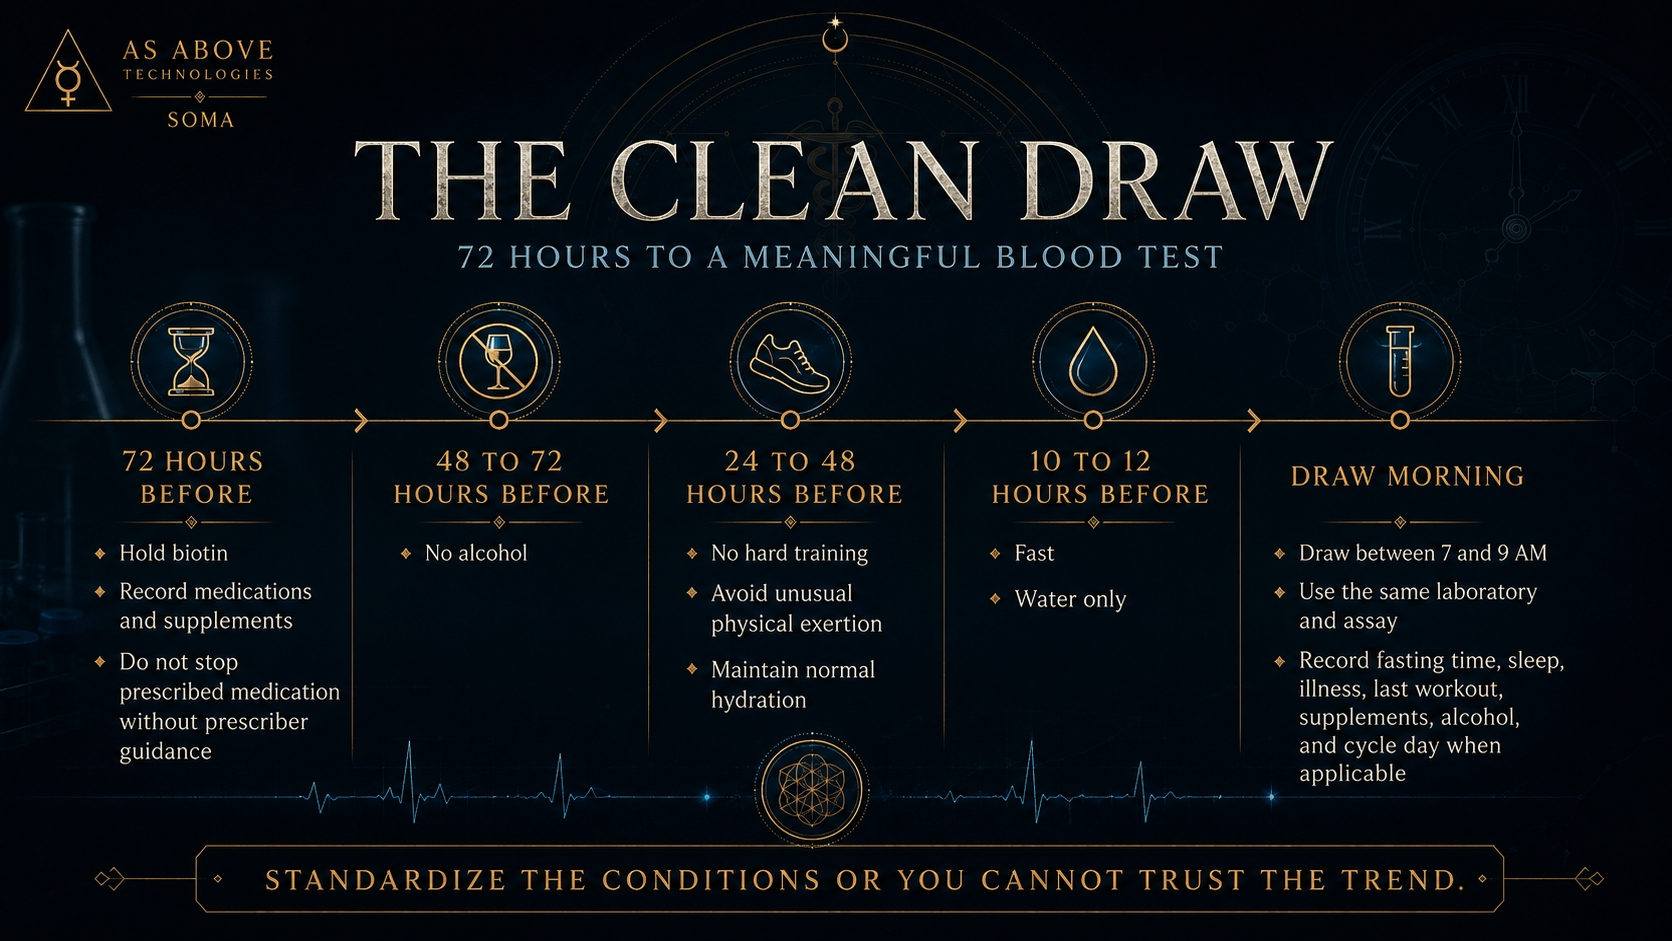
This is the cheapest, most ignored part of the entire system. A trend is only readable if conditions stay constant. If you change the time of day, your training the day before, your hydration, or the lab itself, you have not measured a change in your health. You have measured a change in your circumstances.
| # | Rule | Why |
|---|---|---|
| 1 | Fast 10-12 hours, water only | Required for accurate triglycerides and fasting insulin/glucose. Non-fasting lipid panels are increasingly accepted, but fasting keeps your own series internally consistent. |
| 2 | Draw between 7-9 AM, consistently | Mandatory for testosterone (major diurnal variation) and cortisol. Good practice for everything else. |
| 3 | No alcohol for 48-72 hours | Affects GGT, liver enzymes, and triglycerides. |
| 4 | No hard training for 24-48 hours | Elevates CK, AST, ALT, hs-CRP, and creatinine. Elevated creatinine makes eGFR (kidney function) look worse than it is. A heavy deadlift session two days before a draw can manufacture a fake kidney problem and a fake inflammation problem in the same panel. |
| 5 | Hydrate normally | Dehydration concentrates everything: hemoglobin, hematocrit, albumin, BUN all read artificially high. |
| 6 | Stop biotin at least 72 hours out AND tell the lab | Biotin interferes with many immunoassays including thyroid and cardiac troponin. AACC guidance notes up to 72 hours may be needed. The FDA has stated there is not enough information to guarantee any specific hold time prevents bad results, so 72 hours is a sensible minimum, not a guarantee. Biotin is in most hair/skin/nail supplements and many multivitamins. |
| 7 | Hold non-essential supplements 24-72 hours | Biotin needs the longest hold. Never stop a prescribed medication for a test without asking the prescriber. |
| 8 | Women: record and control cycle day | Day 2-4 for FSH/LH/estradiol/AMH. 7 days post-ovulation for progesterone. Note contraceptive use. |
| 9 | Same lab, same assay, every time | Different platforms produce different absolute values, especially for free testosterone, estradiol, vitamin D, and ferritin. Switching labs mid-series creates a trend that does not exist. |
| 10 | Log your conditions with every draw | Date, time, fasting hours, last workout, alcohol, supplements held, illness, cycle day. This costs nothing and turns a pile of PDFs into actual comparable data. |
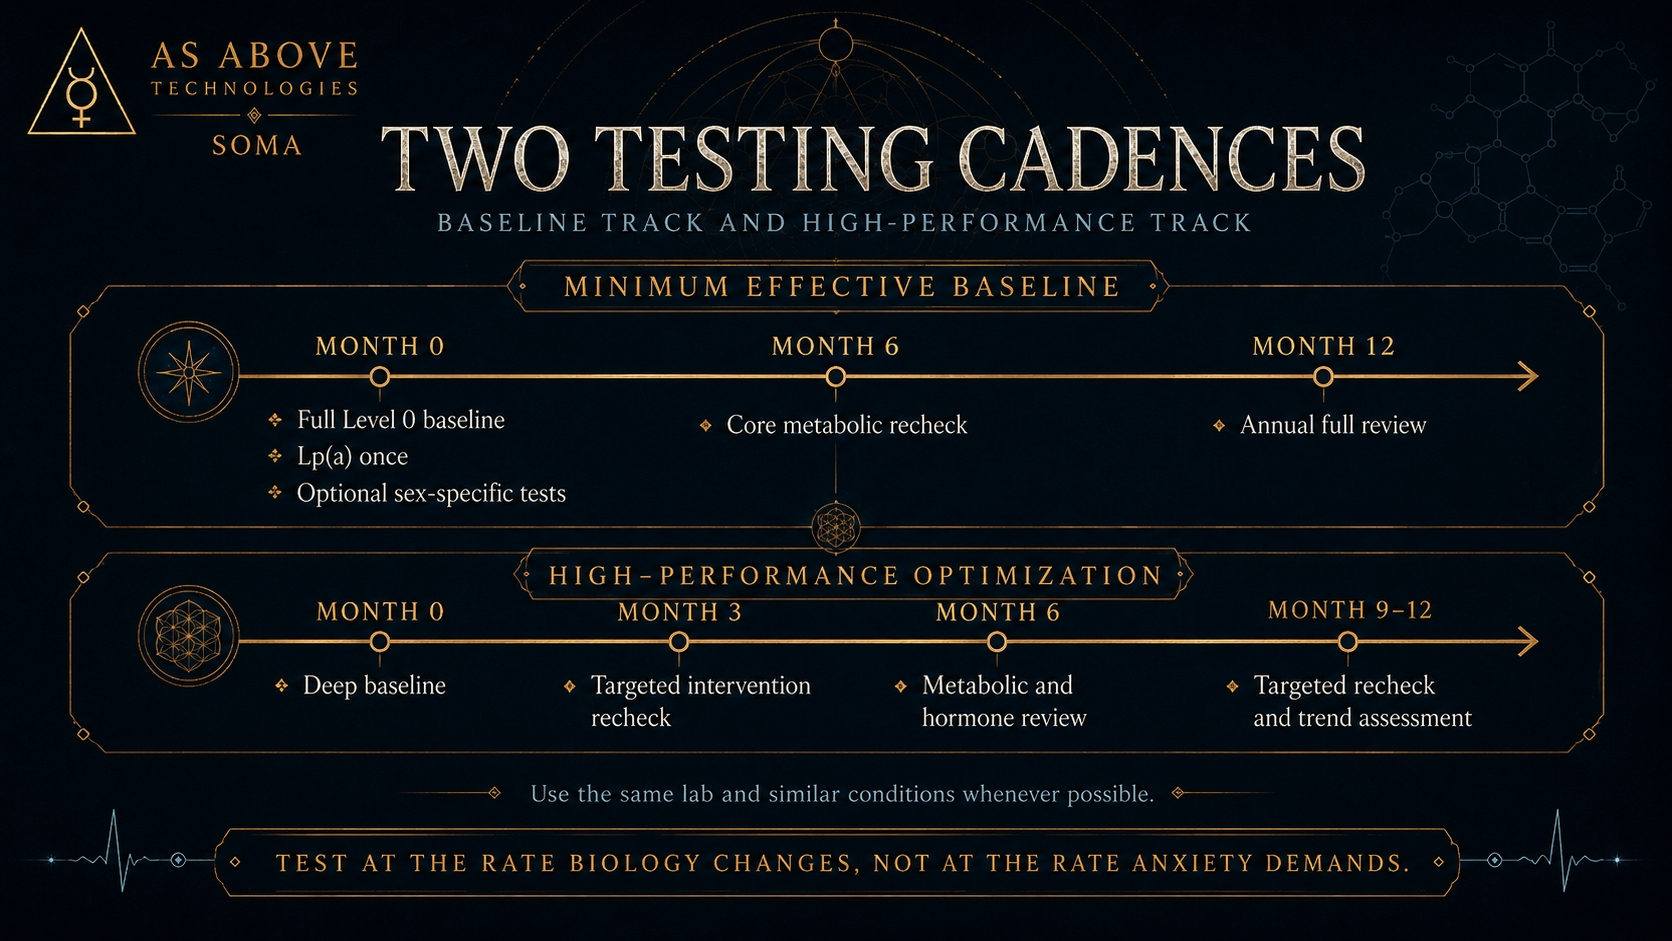
8. Schedule A: Best Bang for Your Buck
This is for the person who wants a real health baseline done correctly without overspending or over-testing. Think of it as the minimum effective dose for knowing what is going on inside your body.
Year 1: Establish Baseline
- Draw 1 (month 0): Full Level 0 panel including CBC, CMP, lipid panel, ApoB, HbA1c, fasting glucose, fasting insulin, TSH + free T4, vitamin D, hs-CRP, ferritin + iron panel. Add Lp(a) (once, never again). Add sex-specific Level 1 markers if budget allows.
- Draw 2 (month 6): Core metabolic recheck: lipids, ApoB, HbA1c, fasting glucose, fasting insulin, hs-CRP. Add any Level 0 markers that flagged on Draw 1.
Estimated cost: Draw 1 is mostly covered by insurance at an annual physical. Out-of-pocket additions (ApoB, Lp(a), fasting insulin, free T3) typically run $75-150 through direct-to-consumer labs. Draw 2 can often be done for $100-200 cash through a panel provider.
Year 2+: Maintenance
- Annual full draw: Complete Level 0 + sex-specific Level 1 once per year, aligned with your annual physical if possible.
- 6-month metabolic check: Lipids, ApoB, HbA1c, fasting glucose, fasting insulin, hs-CRP, vitamin D (especially if seasonally variable).
- Ad hoc: Recheck anything you are actively trying to move, 90 days after starting the intervention. Do not retest HbA1c before 3 months.
Total annual cost: If your annual physical covers the core, expect $150-350/year in out-of-pocket additions. A platform like Function ($365/year) consolidates this and adds breadth.
9. Schedule B: The High-Performance Track
This is for the person who is actively optimizing ... training seriously, supplementing deliberately, managing hormones, or building a comprehensive longevity strategy. More data points, tighter intervals, and full hormone tracking.
Year 1: Deep Baseline
- Draw 1 (month 0): Full Level 0 + full Level 1 sex-specific panel + omega-3 index + cortisol + DHEA-S + IGF-1. Add Lp(a) (once). Consider thyroid antibodies (TPO, TgAb) at baseline.
- Draw 2 (month 3): Targeted recheck of anything you are actively intervening on. This is your first "did it move" check.
- Draw 3 (month 6): Full metabolic + hormones + any markers of concern.
- Draw 4 (month 9-12): Targeted recheck. By now you have 4 data points on your priority markers and real trend visibility.
Year 2+: Optimization Cadence
- Quarterly draws: Core metabolic (lipids, ApoB, HbA1c, fasting glucose + insulin, hs-CRP) plus whatever you are actively managing.
- Full panel every 6 months: Complete Level 0 + Level 1, including hormones.
- Annually: CBC, CMP, full thyroid, vitamin D, omega-3 index, full iron panel.
- 90-day rule: Any time you start or change a supplement, medication, training program, or diet ... retest the relevant marker at 90 days. Not before.
Total annual cost: $600-1,200 depending on how much insurance covers. A Function membership ($365) plus 1-2 targeted add-on orders is an efficient structure. Heavy hormone tracking (TRT, HRT) may run higher through specialty labs.
10. How to Test Whether Your Supplements Are Actually Working
Most people take supplements on faith. They heard something works, they bought it, they take it every day, and they have no idea whether it is doing anything measurable in their body. Here is how to actually find out.
Establish a clean baseline BEFORE starting
Test the relevant marker(s) before you begin the supplement. This is your control measurement. Without it, you have nothing to compare to.
Change only one variable at a time
If you start fish oil, vitamin D, and magnesium simultaneously and your omega-3 index improves, was it the fish oil or the magnesium? You cannot know. Start one supplement, hold everything else constant, and test. Then add the next.
Wait the correct interval before retesting
Every marker has a biological response time. Testing too early is wasted money.
| Supplement | Marker to Track | Minimum Retest Interval |
|---|---|---|
| Vitamin D | 25-OH Vitamin D | 8-12 weeks |
| Fish oil / Omega-3 | Omega-3 Index (EPA+DHA) | 8-12 weeks (red cell membrane turnover) |
| Iron (ferrous bisglycinate, etc.) | Ferritin + iron panel | 8-12 weeks |
| Magnesium | Serum magnesium (imperfect) + symptoms | 4-8 weeks |
| B12 / Methylcobalamin | Serum B12 + methylmalonic acid | 8-12 weeks |
| Creatine | No blood marker needed, performance + body comp | 4-8 weeks |
| Berberine / Glucose-lowering | Fasting glucose, fasting insulin, HbA1c | HbA1c needs 12 weeks minimum; glucose/insulin 4-8 weeks |
| Red yeast rice / Bergamot / Citrus bergamot (lipid-targeted) | LDL-C, ApoB, triglycerides | 8-12 weeks |
| Ashwagandha (cortisol-targeted) | AM cortisol + subjective tracking | 8-12 weeks |
| Zinc | Serum zinc | 8-12 weeks |
Control your draw conditions identically
Same lab, same time of day, same fasting window, same supplement hold protocol, same training rest period. If your pre-supplement draw was at 8 AM fasting at Quest and your post-supplement draw was at 2 PM non-fasting at LabCorp, you have not tested the supplement. You have tested different circumstances.
Decide based on the data, not the marketing
If your omega-3 index was 4.2% before fish oil and 8.1% after 12 weeks, it worked. If your vitamin D went from 28 to 52, it worked. If you have been taking a supplement for 3 months and the relevant marker has not moved, either the dose is wrong, the product quality is poor, or the supplement does not do what it claims. Stop spending money on it.
Document everything
Keep a simple log: supplement name, dose, brand, start date, baseline lab date and value, retest date and value, other changes during the period. This is how you build an actual evidence base for your own body instead of relying on someone else's anecdote or a company's marketing claims.
11. Turning Results Into a Protocol
This is where almost everyone stalls. They test, they get a report, they feel briefly informed, and nothing changes. Here is the sequence that prevents that.
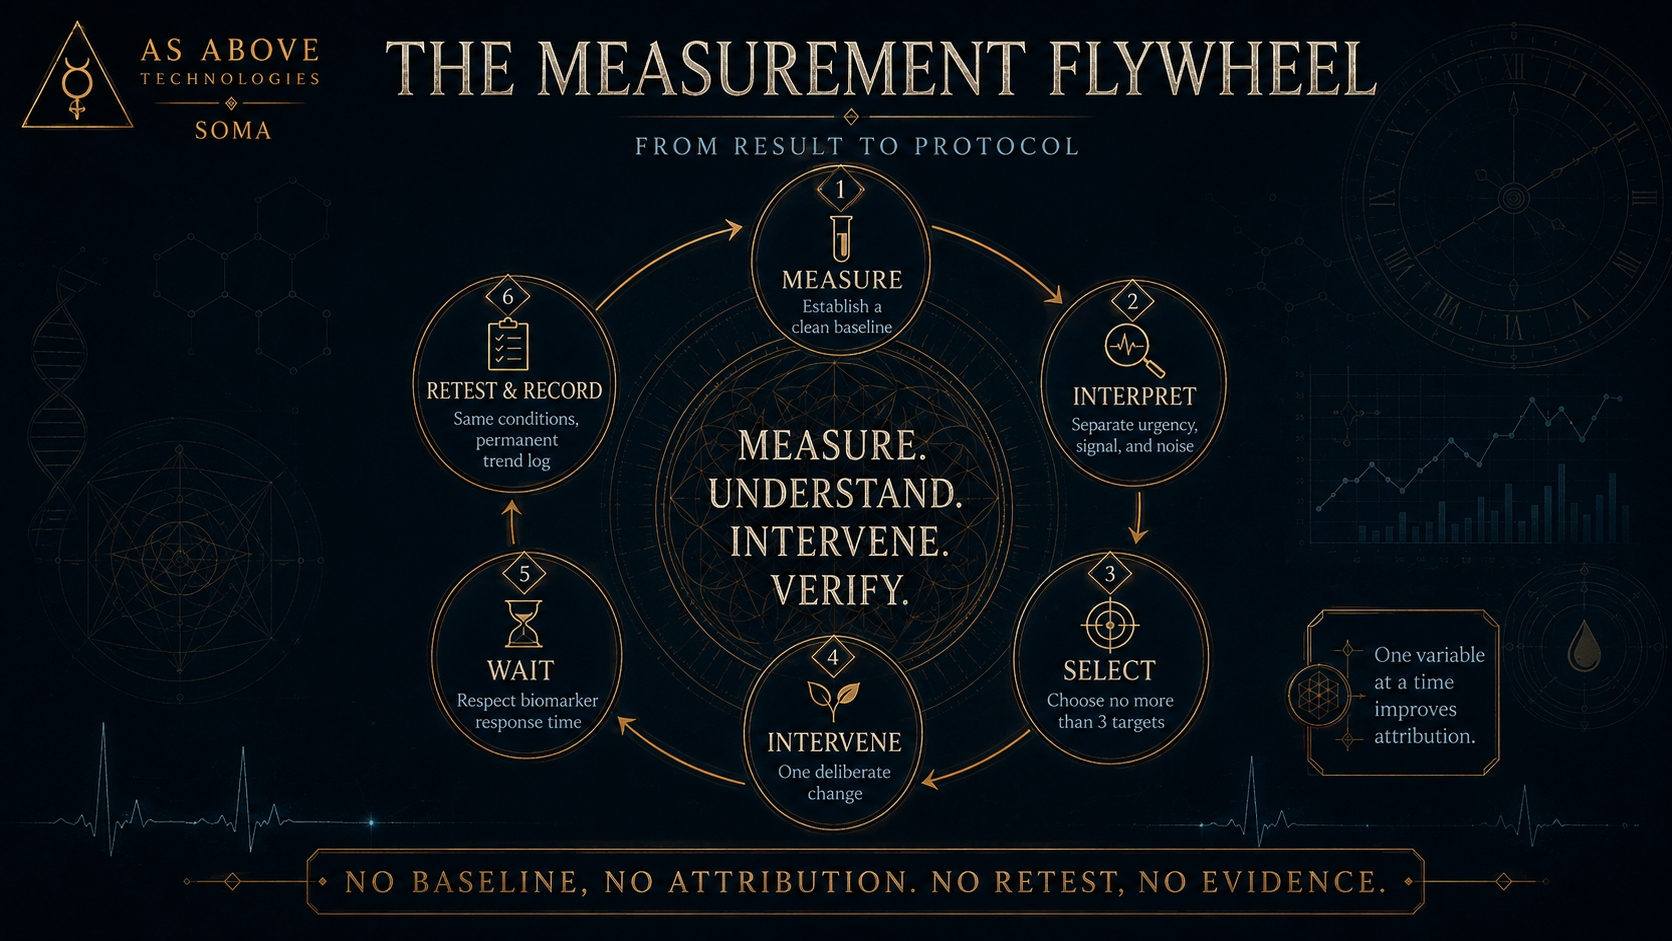
Step 1: Triage before you react
Sort every result into three buckets:
- Urgent: needs a physician now (severely abnormal values, suspicion of serious disease)
- Signal: a real pattern worth investigating and acting on
- Noise: a single mild flag with no supporting context (remember the 5% rule)
Most flags are noise. Do not let red text drive decisions that should be driven by patterns.
Step 2: Look for patterns, not points
Elevated fasting insulin, triglycerides climbing, HDL falling, and a creeping HbA1c is not four separate problems. It is one problem ... insulin resistance ... showing up in four places. Treating it as four separate items is how people end up with four supplements and no improvement. Look for the underlying pattern.
Step 3: Pick a maximum of three targets
Every marker you decide to move needs:
- A specific intervention (what you are doing)
- A specific mechanism (why it should work)
- A specific retest date (when you will check)
If you cannot name all three, it is not a plan.
Step 4: Set the retest date the same day you get results
90 days out for anything metabolic. Put it on the calendar immediately, before motivation decays. The trend line is the actual product of this entire system, and it only exists if you maintain the rhythm.
Step 5: Keep one file
Every result, every draw condition, in one place you control. Not scattered across three patient portals and an email inbox. A spreadsheet works. A personal dashboard works. The tool matters far less than the discipline of putting every result in the same place under the same conditions.
Step 6: Know when to escalate
Some things are not self-managed. Severely abnormal results, suspected cancer, thyroid disease requiring medication, real hormone deficiency, kidney or liver dysfunction ... these need a physician. This system is for building an accurate baseline and having better informed conversations with your doctor. It is not a substitute for medical care.
12. Beyond Blood: The Tests That May Matter More
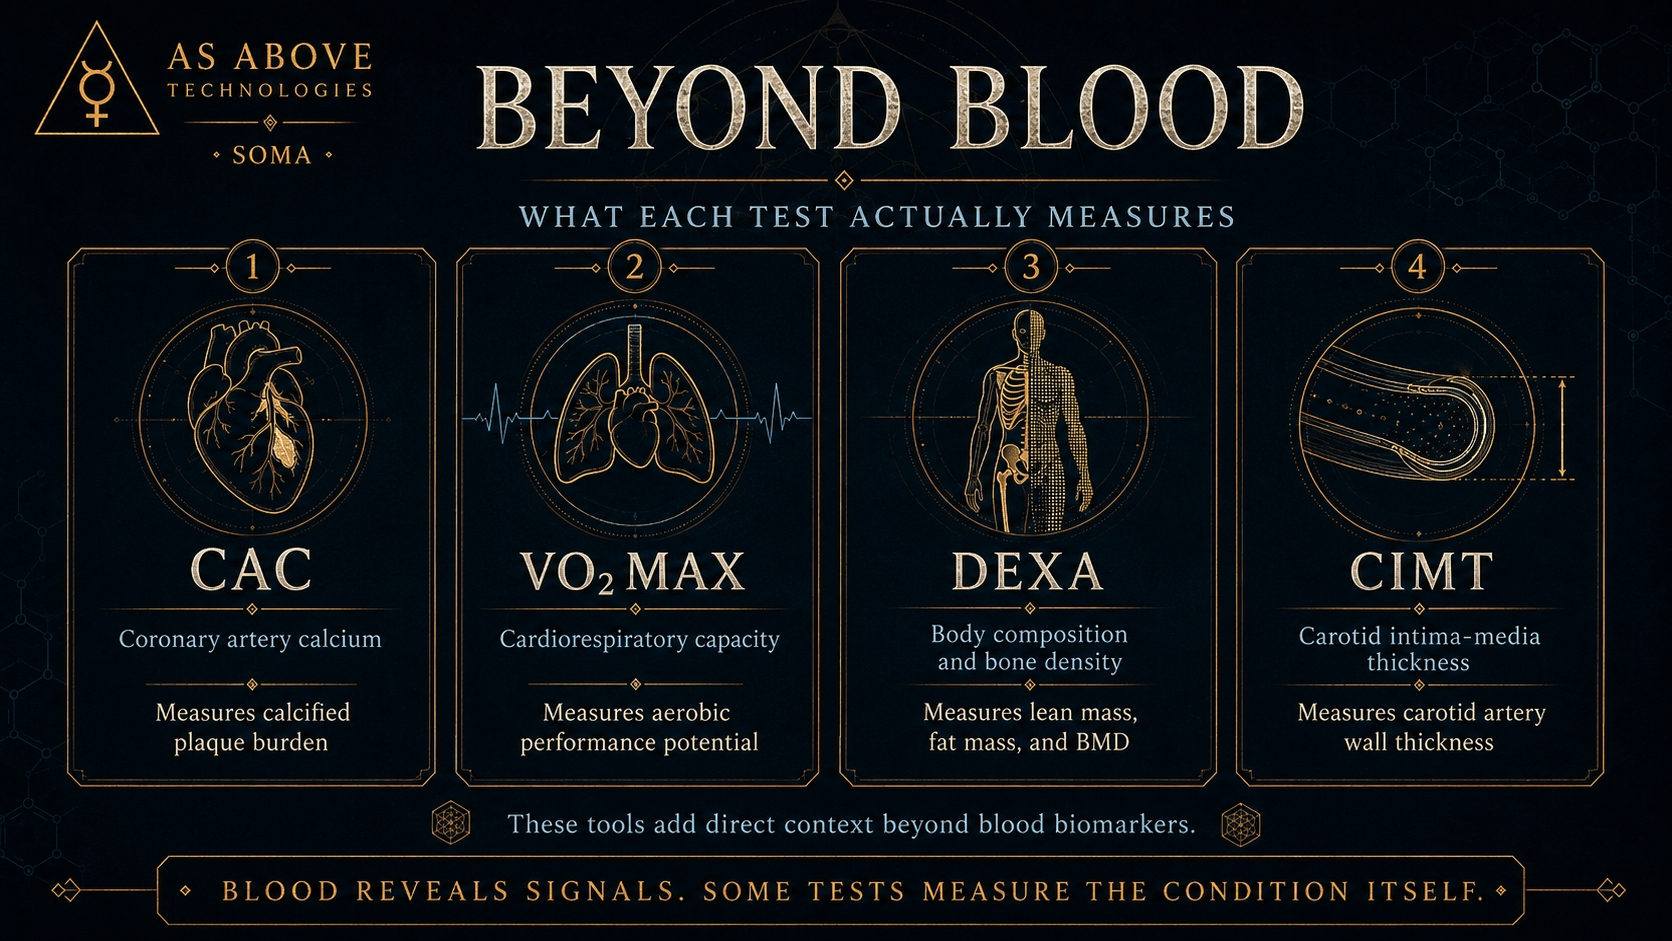
Here is the uncomfortable truth the blood testing industry will not lead with. Some of the highest-value health tests are not blood tests at all.